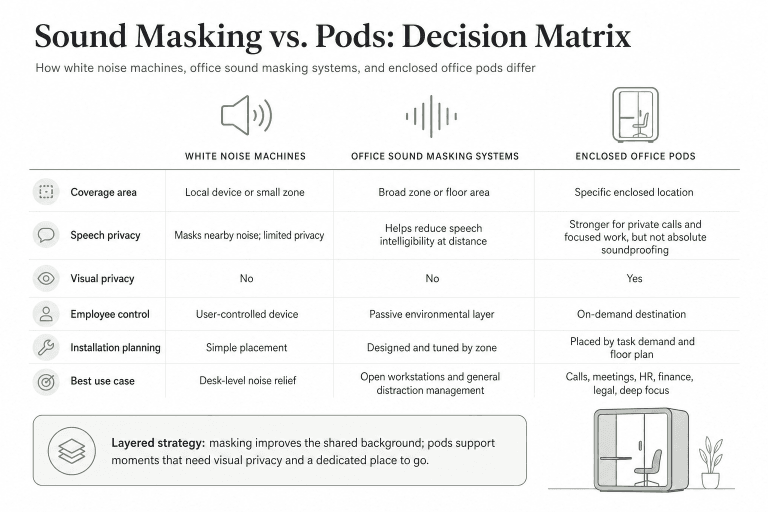
Outlook meeting room booking uses a room mailbox in Microsoft 365 to receive and process reservations. An administrator creates the resource and sets its booking rules. Employees add that resource to a meeting invitation, send the request, and check the room’s response. A meeting on the organizer’s calendar does not, by itself, confirm that the room is reserved.
Use the workflow below for Exchange Online and Outlook on the web with an organizational account. If your administrator has already configured the room, start with the employee booking steps. An organization running on-premises or hybrid Exchange needs its administrator to confirm where the resource is managed.
Last Updated: September 24, 2026|Author: William|Reviewer: Richard
Quick-Start Checklist
Use this sequence when you are setting up a room for the first time:
- Create the room resource. In Exchange admin center, create a room mailbox with the correct name, email address, location, and capacity.
- Set the booking policy. Decide who can book automatically, whether requests need approval, how far ahead people can book, the maximum meeting length, and whether recurring meetings are allowed.
- Make the room discoverable. Add the room to the correct room list and confirm its building, floor, capacity, and other search properties.
- Run one employee booking. In Outlook on the web, create a meeting, choose Browse with Places, select the room resource, and send the invitation.
- Verify the reservation. Confirm that the room sends an acceptance response and that the event appears on the room calendar. The organizer’s calendar alone is not enough.
- Test the failure paths. Submit a conflict, cancel a booking, and test a short recurring series. Record the room response and the affected calendar entries.
- Publish the employee rule. Tell staff which room name to select, how far ahead they may book, whether approval is required, and where to report a decline or unexpected conflict.
If any step fails, stop the rollout and correct the relevant room policy or discovery setting before inviting more employees to use the resource.
How Outlook Meeting Room Booking Works
A room mailbox represents a physical space, such as a conference room or meeting pod. It has an email address and a calendar. When an employee invites it to a meeting, Exchange processes the request according to the room’s availability and booking policy, or routes it to a delegate for approval.
Three things need to agree before you rely on a reservation:
- The invitation includes the correct room resource.
- The room has accepted the requested time.
- The resource calendar reflects that reservation.
Typing a room name as plain text in the location field does not establish this chain. Select the directory resource so the room receives the invitation. Likewise, adding an online meeting link does not replace reserving the physical room.
For recurring meetings, check the response for exceptions and inspect the affected dates. The series can behave differently from a single booking when some occurrences conflict with existing reservations.
Create a Room Mailbox in Exchange Online
Prepare the room details
Ask an administrator with the required Exchange recipient-management permissions to perform the setup. Prepare a unique room name, an available resource email address, its location, actual seating capacity, and the person responsible for its booking policy.
Use a name employees can match to the door, such as Boston — Floor 2 — Meeting Room 03. Give each independently bookable space its own resource identity. Two spaces with nearly identical names make it easy to reserve the wrong one.
For a new enclosure, choose the physical space before entering its attributes. Compare B&H Ergonomics meeting pod models against your meeting size and layout, then register the selected space using its actual capacity and equipment. B&H pods do not include a built-in booking system; your organization manages the Microsoft 365 reservation setup.
Create the resource
In the Exchange admin center:
- Open Recipients > Resources.
- Select Add a room resource.
- Enter the room name and resource email address.
- Complete the relevant properties, including capacity and location.
- Choose the booking options and automatic processing or delegate approval.
- Review the settings and create the resource.
- Return to Resources and verify that the room appears with the intended address and properties.
Official Microsoft example: The Exchange admin center resource setup screen is shown in Microsoft’s resource mailbox documentation. This is an interface reference, not a B&H tenant test result.
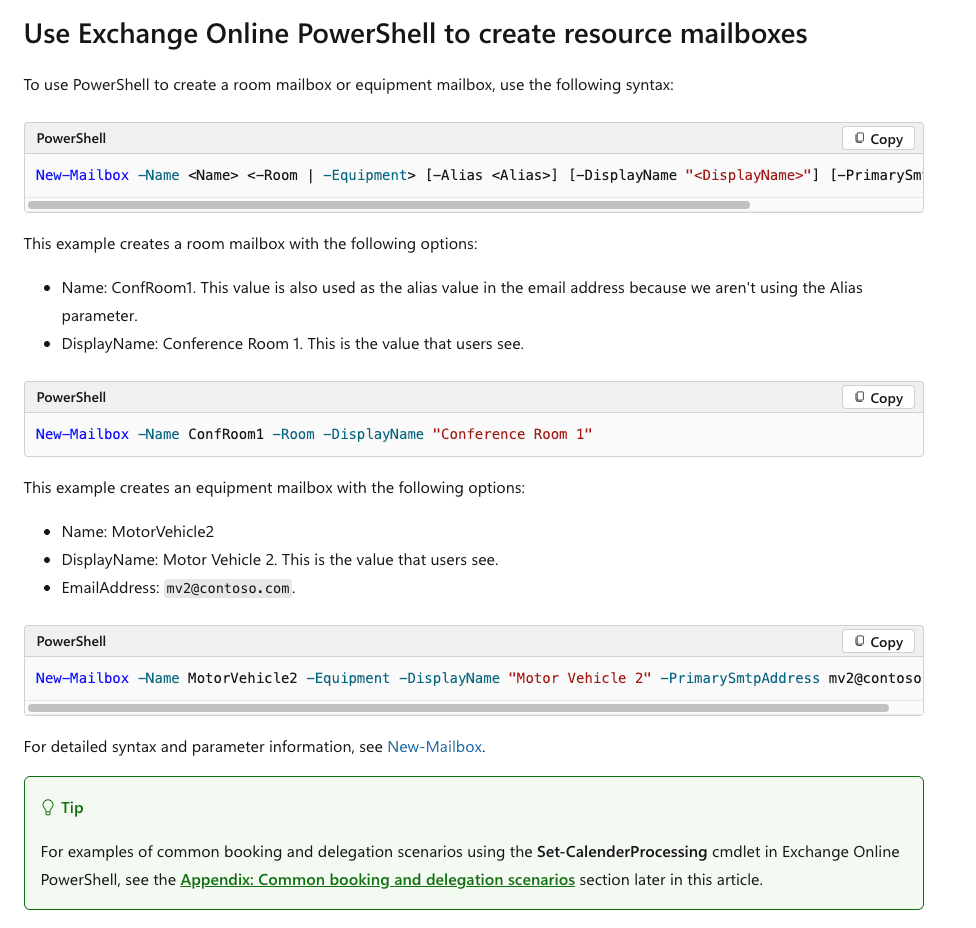
Microsoft’s Exchange Online resource mailbox documentation describes these controls and the permissions required to manage them. Reopen the resource after creation to review its Booking settings; do not assume that the default limits match your office policy.
Make the room discoverable
Room creation and room discovery are separate checks. Configure the location attributes employees use to filter results, including city, floor, and capacity, and organize rooms into an appropriate room list. Microsoft documents room-list creation through Exchange Online PowerShell.
An administrator can use the following pattern in an existing authenticated Exchange Online PowerShell session. Replace the example identities with your own, and use an existing room list if one already serves the building:
New-DistributionGroup -Name "Boston Office Rooms" -RoomList
Add-DistributionGroupMember -Identity "Boston Office Rooms" -Member "[email protected]"
Microsoft’s Room Finder configuration guidance explains room lists and location properties. It allows 24–48 hours for the described property and room-list changes to appear in Room Finder. Record when you made the changes before treating a missing search result as a failed mailbox setup.
Set Booking Rules and Permissions
Start with the intended employee experience: can eligible staff reserve a free room immediately, or must a coordinator approve requests? Then configure that behavior explicitly.
| Decision | What to configure | What to verify |
|---|---|---|
| Automatic booking or approval | Automatic accept/decline, or named booking delegates | An ordinary employee receives the expected response |
| Who may reserve the room | Booking and request policy scope | Allowed and excluded users follow the intended paths |
| How far ahead people may book | Booking window | Requests inside and outside the window behave correctly |
| Maximum meeting length | Duration limit | A request beyond the limit is handled as intended |
| Whether evenings are available | Working-hours restriction and resource time zone | An out-of-hours request uses the room’s intended schedule |
| Whether recurring meetings are allowed | Repeating-meeting setting | A short series with available dates can be processed |
| How conflicts are handled | Conflict settings, including recurring-series thresholds | A second booking cannot silently displace an accepted one |
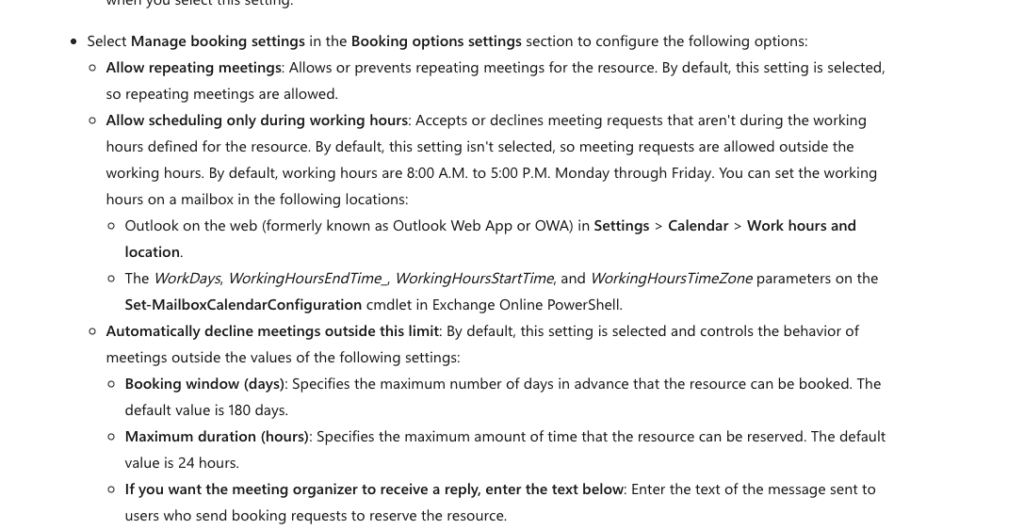
Choose limits from actual operating needs. A two-hour duration limit, for example, is an organizational choice rather than a Microsoft requirement.
Official Microsoft example: Microsoft documents the Booking settings and recurring-meeting controls in the resource mailbox guide. Confirm the values in your tenant before testing.
Separate booking rights from calendar access
These controls serve different purposes:
| Permission or role | What it controls |
|---|---|
| Booking eligibility | Whether a user’s request can be accepted automatically |
| Permission to request approval | Whether a user can submit a request for a delegate to decide |
| Calendar folder permissions | What a person can see or edit in the resource calendar |
| Booking delegate | Who accepts or declines requests under an approval workflow |
| Mailbox Full Access or Send As | Broader mailbox access or sending authority |
An employee does not need Full Access simply to send a booking request. Configure calendar visibility separately so staff can see the availability or details your organization intends to share.
For restricted automatic booking, have IT review AllBookInPolicy and BookInPolicy together with the request-approval settings. Removing automatic approval from a user is not the same as preventing that user from requesting delegate approval. Test both an included and an excluded ordinary account.
Record the recurring-meeting policy
Microsoft documents the relevant behavior in Set-CalendarProcessing. When AllowConflicts is false, the recurring request’s outcome also depends on ConflictPercentageAllowed and MaximumConflictInstances. With both thresholds set to zero, a new series containing a conflicting occurrence is declined.
Do not tell employees that Outlook always rejects only the conflicting occurrence. A policy that permits some conflicts can produce a different result from a zero-conflict policy.
Before testing, an Exchange administrator can capture the current settings with this read-only command:
Get-CalendarProcessing -Identity "[email protected]" |
    Format-List AutomateProcessing,AllBookInPolicy,BookInPolicy,
        AllRequestInPolicy,RequestInPolicy,AllRequestOutOfPolicy,
        RequestOutOfPolicy,ResourceDelegates,ForwardRequestsToDelegates,
        AllowRecurringMeetings,AllowConflicts,ConflictPercentageAllowed,
        MaximumConflictInstances,BookingWindowInDays,
        MaximumDurationInMinutes,ScheduleOnlyDuringWorkHours
Keep that output with the test record. It makes an unexpected result much easier to explain than a screenshot of an invitation alone.
Book a Meeting Room in Outlook on the Web
Use your organization’s Microsoft 365 account and open Outlook Calendar.
- Create a new event and enter the meeting title, attendees, date, and start and end times. Check the time zone.
- Open the location suggestions and select Browse with Places. Microsoft’s current web instructions use this label; other Outlook interfaces can display Room Finder.
- Choose or search for the building, then filter the available rooms by the relevant capacity, floor, or features.
- Select the actual room resource. Confirm that the chosen room matches the physical space you intend to use.
- Check availability for the room and attendees, using Scheduling Assistant where available, and send the invitation.
- Read the room’s response. If it declines or requires approval, the room is not yet confirmed for your meeting.
Official Microsoft example: Outlook on the web uses Browse with Places to select a building and filter rooms. See the Microsoft Support web instructions.
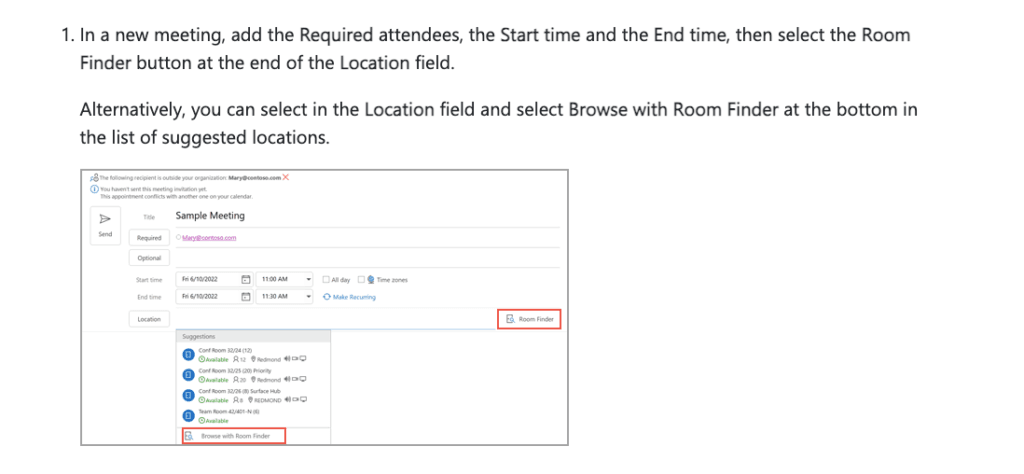
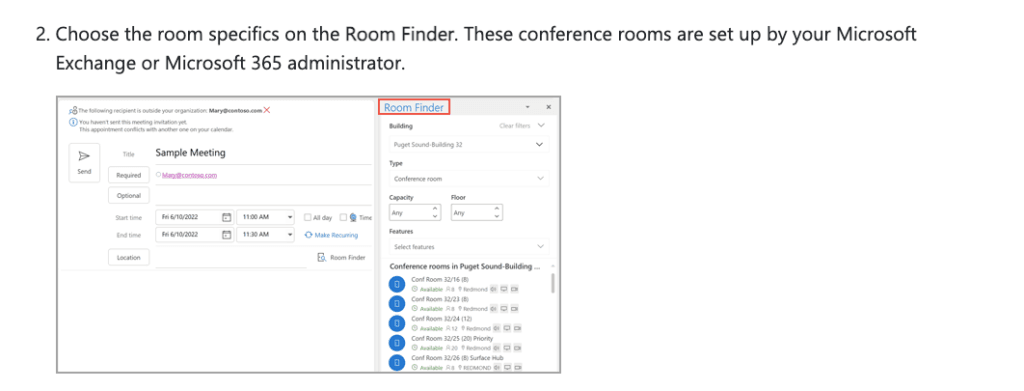
Microsoft’s Scheduling Assistant and Room Finder instructions separate the web and desktop interfaces. Use the instructions for your client rather than looking for a classic Windows ribbon button in the browser.
Availability is a useful starting point, but another employee can request the same time before your booking is processed. The resource response is the confirmation to check after sending.
Official Microsoft example: Use the room response and the resource calendar as two separate confirmation points. The Microsoft Scheduling Assistant and Room Finder guide explains the employee workflow; the acceptance shown in your tenant is the actual test evidence.
Add a room to an existing meeting
If you organized the meeting, open it for editing, add the room resource, and send the update. Check the room’s response to the updated request. If somebody else organized it, ask that organizer to make the change.
For a recurring meeting, decide whether the change applies to one occurrence or the entire series before editing. Adding a room to one date does not establish a reservation for every date.
Change or cancel a reservation
To move a meeting, edit it as the organizer and send the update with the new time. Verify the room’s response for the new slot and check that the previous slot is released.
To cancel, use the organizer’s cancellation workflow and send the cancellation. For a series, choose the individual occurrence or the full series deliberately. Verify the affected room-calendar dates rather than relying only on the event disappearing from your own view.
Test the Room Before Employees Start Booking
Use a test room resource and two ordinary employee accounts, A and B. If the production workflow requires approval, include its delegate as well. Avoid validating employee permissions only through an administrator account.
Record the test date, Outlook client, resource time zone, resource address, and current policy values. Use identifiable test subjects so you can match each invitation, response, and calendar entry.
Establish a baseline
For the automatic-booking tests below, use eligible employees, automatic acceptance, repeating meetings enabled, conflicts disabled, and both recurring-conflict thresholds set to zero. Keep all ordinary test requests inside the configured booking window, duration limit, and permitted hours.
The table describes expected outcomes under that baseline. Complete the actual-result column from your own environment.
| Test | Action | Expected outcome | Actual result |
|---|---|---|---|
| Available slot | A invites the room to an available time | Room accepts; matching reservation appears | Record response and calendar state |
| Overlapping request | After A is accepted, B requests the same room and time | B is declined; A’s reservation remains | Record both responses |
| Cancellation and reuse | A sends cancellation; B then requests the released slot | Original booking releases; B can obtain acceptance | Record release and new acceptance |
| Recurring series without conflicts | A requests three available occurrences | All three dates are reserved | Check each date |
| Recurring series with one conflict | Reserve one of three dates first, then request the series | New series is declined under the zero-conflict policy | Record response and all three dates |
| Cancel one occurrence | Cancel one date from an accepted series | That date releases; the other dates remain | Check all affected dates |
| Cancel the series | Cancel a separate accepted test series | Its affected future reservations release | Check the series dates |
| Move an accepted meeting | Send an update to another available time | New time is accepted; old slot releases | Check both time slots |
| Exceed a limit | Request a meeting beyond a configured duration or booking limit | Request is handled according to the recorded limit policy | Record the limit and response |
Run restricted-user and delegate-approval tests separately when those workflows apply. For a room limited to specified users with no approval route for others, test both an allowed account and an excluded account. For delegate approval, check that a request reaches the delegate and that the organizer receives the final decision.
Also inspect the resource calendar through an ordinary employee account. Confirm that the employee can see the intended availability without gaining unintended access to meeting details or calendar editing.
Keep evidence that explains the result
Test evidence placeholder: Insert your tenant screenshots here after running the conflict, cancellation, and recurring-series tests. Official Microsoft documentation explains the controls, but it does not prove your tenant’s observed result.
For each test, retain the request details, resource response, affected calendar dates, and policy snapshot. Screenshots should preserve the selected occurrence or series, time zone, and acceptance or rejection message while excluding unrelated meeting information.
Use a short record such as:
Test ID: T02 — overlapping request
Configuration: Automatic acceptance; conflicts disabled
Precondition: Account A already has an accepted reservation
Action: Account B requests the same resource and time
Expected: B declined; A unchanged
Actual: Enter the observed response and resource-calendar state
Evidence: Attach the matching screenshots or records
Result: Pass, fail, or not run
If a test fails, record the difference, change one relevant setting or step, and repeat the affected test. Preserve the original result so the correction can be reviewed. Finish with a fresh employee booking using the final configuration.
Troubleshoot Missing Rooms and Booking Problems
| Symptom | Check first | Next action |
|---|---|---|
| Room is missing from search | Resource identity, directory visibility, room-list membership, location attributes, and time since changes | Have IT correct discovery settings; separately test whether a request addressed to the resource is processed |
| Room appears available but declines | Response reason, competing booking, duration, booking window, working hours, and eligibility | Correct the request or policy responsible; check the resource’s current calendar |
| Invitation receives no room response | Whether the resource was actually invited, automatic-processing settings, and delegate workflow | Confirm the resource address; have IT inspect processing or the approval queue |
| Cancellation leaves the room occupied | Organizer identity, whether cancellation was sent, and occurrence-versus-series scope | Inspect the matching resource entry and cancellation processing before attempting another change |
| Recurring request is declined | Conflicts on individual dates, recurrence permission, window, and conflict thresholds | Read the full response and inspect the dates; split or reschedule the request as appropriate |
| Employee can book but cannot see details | Calendar folder permissions | Decide whether busy/free visibility is sufficient; request a permission review only if more detail is needed |
| Room appears empty but remains reserved | Whether the organizer cancelled the unused reservation | Follow the office’s cancellation procedure; verify any separate no-show system before relying on automatic release |
A booking record does not establish that somebody is physically inside the room. If your office needs check-in, occupancy sensing, or automatic no-show release, assess that workflow separately and test the actual system providing it.
Hand Over the Room to Employees
Give staff the exact room name, booking limits, approval rules, and support contact. Keep the everyday instruction short:
Select the room resource, check the time, send the invitation, and wait for the room to accept. Send updates when the time changes. Cancel unused bookings, choosing one occurrence or the whole series carefully.
Assign IT ownership of the mailbox, permissions, and booking policy. Facilities should keep the physical room name, location, capacity, and equipment information accurate. Repeat the relevant acceptance tests after changes to booking rules, delegates, resource identity, or employee workflows.