Quick Answer
An office phone booth installation checklist should confirm the crate size and weight, delivery path, elevator and doorway clearance, floor condition, power and data access, staging space, assembly team, and final inspection points before the booth arrives. For B&H Ergonomics Elite-S, also plan for a protective wooden crate, a 390 kg package, and a prepared three-person assembly area.
Last Updated: July 8, 2026 | Author: Richard | Estimated Reading Time: 9 minutes
Who This Installation Checklist Is For
This checklist is for facility managers, office designers, workplace teams, and procurement managers preparing for an office phone booth delivery. It is not a general DIY construction guide, and it does not compare installation cost scenarios. The goal is simpler: make sure the booth can reach the final location, sit level, connect safely, and pass inspection after assembly.
If your team is still comparing models before installation planning, start with the B&H Ergonomics office phone booth category. If you already have a booth on the way, use this page as a pre-delivery and post-installation checklist.
Before Delivery: Confirm the Booth, Crate, and Site Are Ready
Before the truck arrives, confirm three things in writing: what is being delivered, where it will be placed, and who is responsible for moving it from the receiving point to the final installation area.
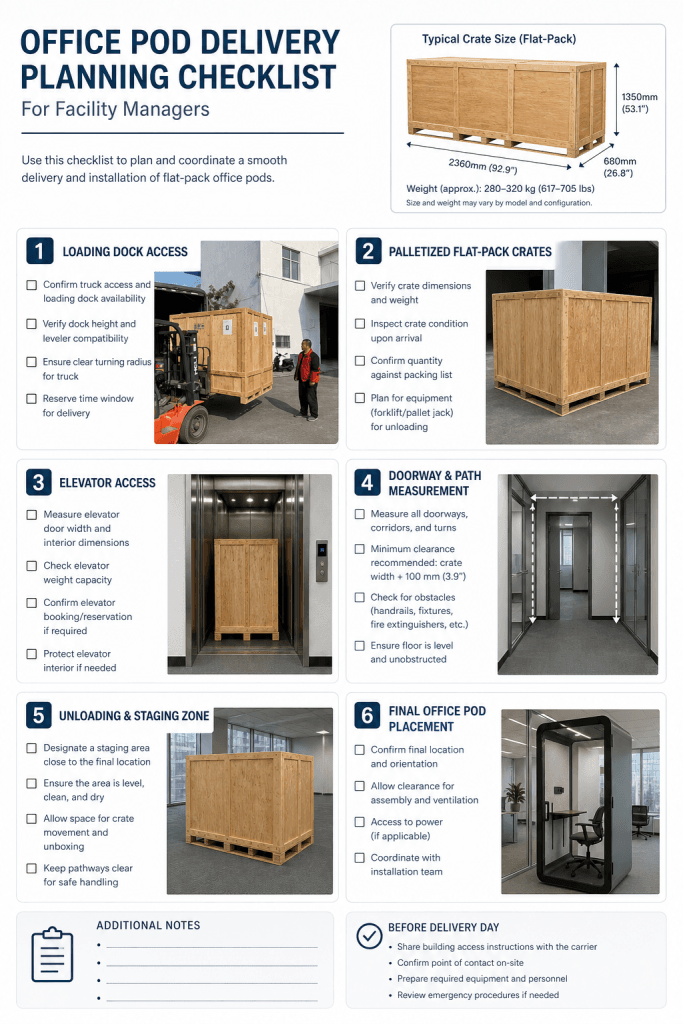
For the B&H Ergonomics Elite-S, the package is designed for safe shipment in a protective wooden crate. The crate size is approximately W2360 x D680 x H1350 mm, or about 92.9 x 26.8 x 53.1 in. The package weight is about 390 kg, or 860 lb.
| Pre-Delivery Item | What to Confirm | Why It Matters |
|---|---|---|
| Booth model | Confirm the exact model, configuration, and finish | Prevents receiving or placement mistakes |
| Crate size | W2360 x D680 x H1350 mm for Elite-S | Helps confirm door, corridor, and elevator access |
| Package weight | About 390 kg / 860 lb for Elite-S | Affects handling equipment and elevator capacity |
| Receiving point | Loading dock, curbside, lobby, or freight area | Determines how far the booth must be moved |
| Final location | Exact room, floor, and booth orientation | Reduces last-minute layout changes |
| Assembly area | Clear space around the final location | Gives the team room to unpack and assemble safely |
Do not wait until delivery day to measure the route. The final room may fit the booth perfectly, while the hallway, elevator, or tight corner blocks the crate or panels from getting there.
Step 1: Measure the Delivery Route Before the Booth Arrives
Walk the full route from the receiving point to the final installation spot. Measure the narrowest and lowest points, not just the destination. I usually look for the “one point of failure”: the tightest door, the smallest elevator opening, the lowest ceiling obstruction, or the sharpest turn.
| Route Checkpoint | Measurement to Record | Pass/Concern |
|---|---|---|
| Loading dock or receiving door | Height x width | |
| Main building entrance | Height x width | |
| Freight elevator door | Height x width | |
| Elevator interior | Height x width x depth | |
| Elevator weight capacity | Rated load limit | |
| Narrowest corridor | Clear width | |
| Lowest ceiling, pipe, or light fixture | Clear height | |
| Tightest turn | Whether the longest crate or panel can turn safely | |
| Final doorway | Height x width |
If any checkpoint is close to the crate size, take photos and confirm the route with B&H Ergonomics before delivery. A few minutes of route checking can prevent a crate from being stranded in a lobby, freight area, or hallway.
Step 2: Check Elevator, Door, Hallway, and Turning Clearances
For multi-floor offices, the elevator is often the hardest checkpoint. Confirm both the door opening and the inside cabin size. A crate may fit through the elevator door but still fail to fit inside the cabin, or it may fit inside the elevator but exceed the weight limit when handling equipment is included.
If your site has only a passenger elevator, ask the building manager whether freight delivery is allowed and whether the elevator can handle a package near 390 kg / 860 lb. If the answer is unclear, do not assume the delivery team can “make it work.” Confirm before scheduling.
Also check corners. Long components can be harder to turn than they look on paper. Measure the turn, take photos, and mark any obstacles such as wall-mounted fixtures, handrails, low pipes, access control gates, or narrow vestibules.
Step 3: Confirm Floor Level, Load, and Final Placement
The booth should be installed on a stable, reasonably level floor. Uneven placement can affect door alignment, panel fit, and the quality of the acoustic seal. For workplace projects, the floor check should happen before the booth arrives, not after the crate is opened.
Use this placement checklist:
| Placement Check | What to Look For | Action |
|---|---|---|
| Floor level | Obvious slope, uneven tile, transitions, soft areas | Mark the final footprint and check before delivery |
| Floor strength | Raised floor, older slab, or uncertain load rating | Ask the building manager if the floor can support the package and installed booth |
| Carpet type | Low-pile commercial carpet vs. thick soft carpet | Avoid unstable placement on thick plush carpet |
| Door swing | Enough room for entry, exit, and daily use | Confirm orientation before assembly |
| Nearby circulation | No blocked aisles, emergency routes, or desks | Keep normal workplace movement clear |
| Wall proximity | Enough clearance for placement and access | Avoid trapping cords or service points |
B&H Ergonomics booths are designed with leveling in mind, but site conditions still matter. If the floor has a noticeable slope, raised access panels, or uncertain load capacity, confirm the condition before delivery or ask for project support.
Step 4: Plan Power, Data, and Cable Safety
A phone booth is not useful if the power cord crosses a walkway, the outlet is blocked, or the Wi-Fi signal is weak during video calls. Plan power and data before the installation day.
For most office installations, confirm:
- The outlet location relative to the booth’s final position.
- The voltage and plug type required for the model and project market.
- Whether a new outlet or cable management path is needed.
- Whether the booth will support video calls that require stable connectivity.
- Whether the cord path creates a trip hazard.
- Whether building rules require a licensed electrician for any electrical changes.
If ventilation performance is part of the buyer decision, review the B&H Ergonomics phone booth ventilation guide before installation. Ventilation, power, and placement are connected: a booth can look correctly installed but still feel uncomfortable if power, airflow, or cable planning is treated as an afterthought.
Step 5: Inspect the Wooden Crate on Delivery
When the crate arrives, inspect it before unpacking. This is especially important for a heavy item such as Elite-S, which ships in a protective wooden crate of about 390 kg / 860 lb.
Use a simple delivery inspection process:
- Check the crate exterior for visible damage.
- Photograph all sides before opening.
- Photograph any dented, cracked, wet, or punctured areas.
- Confirm the shipping label and model information.
- Move the crate only with suitable handling equipment.
- Keep hardware, panels, and packaging organized during unpacking.
- Report damage immediately before assembly continues.
For safe handling practices, OSHA’s official Materials Handling and Storage guidance is a useful reference for workplace teams moving heavy materials. For the actual booth installation sequence, follow the B&H Ergonomics installation instructions for the specific model.
Step 6: Prepare the Installation Area and Assembly Team
Before assembly starts, clear the work area around the final booth position. Remove loose furniture, floor clutter, and obstacles that could interfere with panel handling. Keep the crate, panels, fasteners, and tools organized so the team does not waste time searching for parts.
For B&H Ergonomics Elite-S, the default installation route is customer self-assembly. When the site is prepared, the crate is unpacked, and the assembly sequence is followed correctly, three people can assemble an Elite-S in about 10 minutes. This timing should be treated as a prepared-site expectation, not a promise for every site condition.
For projects that need white-glove support, B&H Ergonomics can coordinate third-party installation service in the United States, Canada, and Sydney, subject to project location and availability. Confirm this early if your building has strict delivery rules, limited dock access, union labor requirements, or a tight move-in schedule.
Step 7: Run the Final Post-Installation Inspection
After assembly, inspect the booth before handing it over to employees. The inspection should cover stability, door alignment, power, ventilation, and basic acoustic privacy.
| Inspection Item | What to Check | Pass Standard |
|---|---|---|
| Booth stability | Stand inside and check for wobble or shifting | Booth feels stable and level |
| Door alignment | Door opens, closes, and latches smoothly | No rubbing, dragging, or forced closure |
| Door seal | Check visible gaps around the door | Seal appears even and consistent |
| Power | Test outlet, lighting, and controls | All powered features work |
| Ventilation | Turn on fans and feel airflow | Airflow is present and consistent |
| Cable path | Check exposed cords around the booth | No trip hazard across walkways |
| Interior finish | Remove protective film and visible packing debris | Booth is clean and ready for use |
| User test | Sit or stand inside for a short call simulation | Booth feels usable for normal work |
Do not skip the final inspection. Small installation issues, such as an uneven base or poorly aligned door, can affect everyday use and acoustic privacy.
B&H Elite-S Installation Notes
Use these B&H Ergonomics Elite-S details when planning access and handling:
| Elite-S Installation Detail | Planning Note |
|---|---|
| Packaging | Protective wooden crate |
| Crate size | W2360 x D680 x H1350 mm / about 92.9 x 26.8 x 53.1 in |
| Package weight | About 390 kg / 860 lb |
| Standard installation route | Customer self-assembly |
| Prepared-site assembly | Three people can assemble Elite-S in about 10 minutes after unpacking and following the installation sequence |
| Optional service | Third-party white-glove installation may be coordinated in the U.S., Canada, and Sydney, subject to location and availability |
For buyers still planning booth selection, the installation note is simple: choose the booth after confirming the route, floor, and power conditions. A booth that fits the room but cannot pass through the building is not installation-ready.
What to Prepare Before Requesting a Quote
If you want B&H Ergonomics to check fit before purchase or delivery, prepare the following:
- Final booth location photos.
- Delivery route photos from dock to final room.
- Door, hallway, and elevator measurements.
- Elevator weight capacity.
- Floor type and any slope or raised-floor details.
- Outlet position and power requirements.
- Preferred booth orientation and door swing.
- Whether self-assembly or third-party installation support is needed.
This information helps B&H Ergonomics review the project faster and recommend the right next step, whether that is model confirmation, layout planning, or installation support.
FAQ
What should I check before office phone booth delivery?
Before delivery, confirm the crate size, package weight, receiving point, delivery route, elevator capacity, doorway width, hallway turns, floor condition, outlet location, and final booth orientation. For B&H Ergonomics Elite-S, plan for a protective wooden crate about W2360 x D680 x H1350 mm and about 390 kg / 860 lb.
Can an office phone booth be installed on carpet?
An office phone booth can often be installed on low-pile commercial carpet if the floor is stable and the booth can be leveled correctly. Avoid thick, soft, or uneven carpet that may make the booth unstable or affect door alignment. If the floor condition is uncertain, confirm with B&H Ergonomics before delivery.
Does an office phone booth installation require an electrician?
Not always. Many office phone booth projects use an existing outlet, but the required voltage, plug type, and electrical rules depend on the model and market. If a new outlet, hardwired connection, floor box, or cable route is needed, use a qualified electrician and follow local building requirements.
How many people are needed to assemble the B&H Ergonomics Elite-S?
For a prepared Elite-S installation, three people can assemble the booth in about 10 minutes after unpacking and following the correct assembly sequence. This assumes the route is clear, the floor is ready, parts are organized, and the team is prepared before assembly begins.
Does B&H Ergonomics provide installation service?
Customer self-assembly is the default route. If a project needs white-glove support, B&H Ergonomics can coordinate third-party installation service in the United States, Canada, and Sydney, subject to location and availability. Confirm this before delivery if your building has strict access or scheduling requirements.